2.1. Running the Land DA Workflow (Ursa/Orion/Hercules/Gaea-C6)
This chapter provides instructions for building and running the Unified Forecast System (UFS) Land DA System using a Jan. 19-20, 2025 00z sample LND warmstart case using ERA5 and IMS data and the 3D-Var algorithm with the UFS Noah-MP land component and data atmosphere (DATM) component.
This case corresponds to the January 2025 Gulf Coast Blizzard, which brought unprecedented snowfall to the entire Gulf Coast. Leading up to the event, the polar vortex stretched far south and met with unusually warm Gulf waters. In response, the National Weather Service (NWS) issued a series of winter storm warnings, extreme cold warnings, and even blizzard warnings — the first ever in some areas. New Orleans, LA received a record 8 inches of snow, and the surrounding coastal areas likewise saw record-breaking snowfall and cold temperatures.
Attention
These steps are designed for use on Level 1 systems (e.g., Ursa, Hercules) and may require significant changes on other systems. It is recommended that users on other systems run the containerized version of Land DA. Users may reference Chapter 2.2: Containerized Land DA Workflow for instructions.
2.1.1. Create a Working Directory
Users can either create a new directory for their Land DA work (e.g., landda) or choose an existing directory, depending on preference. Then, users should navigate to this directory. For example, to create a new directory and navigate to it, run:
mkdir /path/to/landda
cd /path/to/landda
where /path/to/landda is the path to the directory where the user plans to run Land DA experiments (e.g., /Users/Joe.Schmoe/landda). In experiment configuration files and scripts, this directory is referred to as ${exp_basedir}.
Optionally, users can save this directory path in an environment variable (e.g., ${BASEDIR}) to avoid typing out full path names later.
export BASEDIR=`pwd`
In this documentation, ${BASEDIR} is used, but users are welcome to choose another name for this variable if they prefer.
2.1.2. Get Code
Clone the Land DA workflow repository v3.0.0 release:
git clone -b release/public-v3.0.0 --recursive https://github.com/ufs-community/land-DA_workflow.git
Attention
When working with a release branch, be sure to follow instructions in the release branch documentation. View the v3.0.0 release documentation here. When working with the develop branch, the develop branch documentation is most appropriate.
To clone the develop branch instead, run:
git clone -b develop --recursive https://github.com/ufs-community/land-DA_workflow.git
2.1.3. Build the Land DA System
Navigate to the
sorcdirectory.cd ${BASEDIR}/land-DA_workflow/sorcRun the build script
app_build.sh:./app_build.shUsers may need to press the
Enterkey to advance the build once the list of currently loaded modules appears. If the code successfully compiles, the console output should include:[100%] Completed 'ufs_model.fd' [100%] Built target ufs_model.fd ... exit 0
Additionally, the
execdirectory will contain the following executables:apply_incr.execalcfIMS.exetile2tile_converter.exeufs_model
2.1.4. Configure an Experiment
Several sample experiment configurations come with the Land DA System. Although this chapter outlines how to run the config.LND.era5.3dvar.ims.DA-fcst.warmstart.yaml case, the following cases are available for use in the land-DA_workflow/parm/config_samples directory:
config.ATML.3dvar.ghcn.DA-fcst.coldstart.yamlconfig.ATML.3dvar.ghcn.DA-fcst.warmstart.yamlconfig.LND.bkg_ext_src_test.yamlconfig.LND.era5.3dvar.ims.DA-fcst.warmstart.yamlconfig.LND.era5.letkfoi.ghcn.DA-fcst.coldstart.yamlconfig.LND.era5.letkfoi.smap.free-fcst.warmstart.yamlconfig.LND.era5.letkfoi.smops.free-fcst.coldstart.yamlconfig.LND.gswp3.3dvar.ghcn.DA-fcst.coldstart.yamlconfig.LND.gswp3.letkfoi.ghcn.DA-fcst.warmstart.yaml
The sample configuration files are named based on their features:
Atmospheric forcing data (
gswp3orera5) — if anyDA algorithm (
letkfoior3dvar)Snow depth data source (IMS, GHCN, SFCSNO) or soil moisture data source (SMAP, SMOPS)
Users are encouraged to explore and modify the options available!
2.1.4.1. Load the Workflow Environment
To load the workflow environment, run:
cd ${BASEDIR}/land-DA_workflow
module use modulefiles
module load wflow_<platform>
where <platform> is ursa, orion, hercules, or gaeac6.
2.1.4.2. Modify the Workflow Configuration YAML
Copy the experiment settings into config.yaml:
cd ${BASEDIR}/land-DA_workflow/parm
cp config_samples/config.LND.era5.3dvar.ims.DA-fcst.warmstart.yaml config.yaml
Users will need to configure the account variable in config.yaml and choose an EXP_CASE_NAME if a different name for the experiment is desired:
ACCOUNT:A valid account name. Most NOAA RDHPCS systems require a valid account name; other systems may not (in which case, any value will do).
EXP_CASE_NAME:This variable can be changed to any name the user wants (but note that whitespace and some punctuation characters are not allowed). However, the best names will indicate useful information about the experiment. This documentation useslnd_era5_3dvar_ims_00to indicate that it is an ERA5-LND case using 3D-Var data assimilation of IMS observations.
Note
To determine an appropriate ACCOUNT field for Level 1 systems that use the Slurm job scheduler, run saccount_params. On other systems, running groups will return a list of projects that the user has permissions for. Not all listed projects/groups have an HPC allocation, but those that do are potentially valid account names.
Users may configure other elements of an experiment in config.yaml if desired. For example, users may wish to alter DATE_FIRST_CYCLE, DATE_LAST_CYCLE, and/or DATE_CYCLE_FREQ_HR to indicate a different start cycle, end cycle, and increment. Users may also wish to change the DA algorithm from 3dvar to letkf-oi via the JEDI_ALGORITHM variable. Users who wish to run a more complex experiment may change the values in config.yaml using information from Sections 3.1: Workflow Configuration Parameters, 3.2: I/O for the Land DA System, and 3.3: JEDI DA System.
Attention
When regenerating an experiment from the same or similar config.yaml file, if the EXP_CASE_NAME remains the same, the old experiment directory with that name will be renamed with the *_old suffix, and the new experiment directory will use EXP_CASE_NAME. However, the envir directory will NOT be regenerated unless the envir parameter is given a new name. If it keeps the same name, the previous ptmp/<envir> directory and everything in it will remain (rather than being renamed), and the experiment will continue from where it left off using the files from the previous directory. This can be helpful in certain cases but detrimental in others, so users need to make a conscious choice based on their use case.
2.1.4.2.1. Data
Table 2.1 shows the locations of pre-staged data on NOAA RDHPCS (e.g., Ursa, Hercules). These data locations are already linked to the Land DA System during the build but are provided here for informational purposes.
Platform |
Data Location |
|---|---|
Hercules & Orion |
/work/noaa/epic/UFS_Land-DA_v3.0/inputs |
Gaea-C6 |
/gpfs/f6/bil-fire8/world-shared/UFS_Land-DA_v3.0/inputs |
Ursa |
/scratch3/NAGAPE/epic/UFS_Land-DA_v3.0/inputs |
Users who have difficulty accessing the data on Ursa, Orion, Hercules, or Gaea-C6 may download it according to the instructions in Section 2.2.3. Its subdirectories are soft-linked to the land-DA_workflow/fix directory by the build script (sorc/app_build.sh); when downloading new data, it should be placed in or linked to the fix directory.
2.1.4.3. Set Up the Workflow
Generate the experiment directory by running:
./setup_wflow_env.py -p=<platform>
where <platform> is ursa, orion, hercules, or gaeac6.
If the command runs without issue, this script will print override messages, experiment details, and “Schema validation succeeded” messages to the console, similar to the following excerpts:
Python Log Level= str: INFO, attr: 20
INFO::/scratch3/NAGAPE/epic/User.Name/ursa/landda/land-DA_workflow/parm/./setup_wflow_env.py::L35:: Current directory (PARMdir): /scratch3/NAGAPE/epic/User.Name/ursa/landda/land-DA_workflow/parm
INFO::/scratch3/NAGAPE/epic/User.Name/ursa/landda/land-DA_workflow/parm/./setup_wflow_env.py::L37:: Home directory (HOMEdir): /scratch3/NAGAPE/epic/User.Name/ursa/landda/land-DA_workflow
INFO::/scratch3/NAGAPE/epic/User.Name/ursa/landda/land-DA_workflow/parm/./setup_wflow_env.py::L39:: Experimental base directory (exp_basedir): /scratch3/NAGAPE/epic/User.Name/ursa/landda
INFO::/scratch3/NAGAPE/epic/User.Name/ursa/landda/land-DA_workflow/parm/./setup_wflow_env.py::L220:: Experimental case directory /scratch3/NAGAPE/epic/User.Name/ursa/landda/exp_case/lnd_era5_3dvar_ims_00 has been created.
INFO::/scratch3/NAGAPE/epic/User.Name/ursa/landda/land-DA_workflow/parm/./setup_wflow_env.py::L227:: Rocoto YAML template: /scratch3/NAGAPE/epic/User.Name/ursa/landda/land-DA_workflow/parm/templates/template.land_analysis.yaml
**************************************************
Overriding              ACCOUNT = epic
Overriding                  APP = LND
Overriding           ATMOS_FORC = era5
Overriding      ATM_IO_LAYOUT_X = 1
Overriding      ATM_IO_LAYOUT_Y = 1
...
Overriding  nprocs_forecast_atm = 12
Overriding  nprocs_forecast_lnd = 12
Overriding      nprocs_per_node = 26
Overriding    partition_default = u1-compute
Overriding        queue_default = batch
Overriding               res_p1 = 97
**************************************************
                 res_p1: 97
        ATM_IO_LAYOUT_X: 1
                    APP: LND
              OBS_SMOPS: NO
    DO_BKG_ANAL_EXT_SRC: NO
...
        nprocs_forecast: 26
              DT_RUNSEQ: 3600
                 FCSTHR: 24
             CCPP_SUITE: FV3_GFS_v17_p8_ugwpv1
    nprocs_forecast_lnd: 12
CUSTOM_JEDI_CONFIG_FLAG: NO
INFO::/scratch3/NAGAPE/epic/ufs-conda/miniconda3/envs/ufs-land-da-wflow-i11/lib/python3.11/site-packages/uwtools/config/validator.py::L81::Schema validation succeeded for Rocoto config
INFO::/scratch3/NAGAPE/epic/ufs-conda/miniconda3/envs/ufs-land-da-wflow-i11/lib/python3.11/site-packages/uwtools/rocoto.py::L81::Schema validation succeeded for Rocoto XML
The setup script (./setup_wflow_env.py) will create an experiment directory, located by default at ${BASEDIR}/exp_case/${EXP_CASE_NAME}/. It will populate this directory with the experiment configuration file (land_analysis.yaml), the workflow XML file (land_analysis.xml), and the workflow launch script (launch_rocoto_wflow.sh), as well as several directories described in Table 2.2 below.
File/Directory Name |
Description |
|---|---|
|
Script to automate running of the launch script ( |
|
Symlink to the |
|
Combines information from the user’s |
|
Workflow XML file used by the Rocoto workflow manager to determine which tasks (or “jobs”) to submit to the batch system and when to submit them (e.g., when task dependencies are satisfied) |
|
Workflow launch script |
|
Symlink to the directory containing log files for the Rocoto workflow ( |
|
Symlink to the |
For a deeper understanding of the setup_wflow_env.py script, see Figure 3.1.
2.1.5. Run the Experiment
To run the experiment, users can automate job submission or submit tasks manually via rocotorun.
2.1.5.1. Workflow Overview
Each Land DA experiment includes multiple tasks that must be run in order to satisfy the dependencies of later tasks. These tasks are housed in the J-job scripts contained in the jobs directory.
J-job Task |
Description |
Application |
Executables |
|---|---|---|---|
PREP_DATA |
Retrieves or creates the observation data files or the DATM forcing data files |
LND/ATML |
|
FCST_IC |
Generates initial conditions (IC) files for the ATML coldstart configuration only |
ATML (coldstart) |
chgres_cube from UFS_UTILS |
JCB |
Generates JEDI configuration YAML file |
LND/ATML |
|
PRE_ANAL |
Transfers the snow depth or soil moisture data from the restart files to the surface data files |
LND |
tile2tile_converter.exe |
ANALYSIS |
Runs JEDI and adds the increment to the surface data files |
LND/ATML |
fv3jedi_letkf.x / fv3jedi_var.x & apply_incr.exe |
POST_ANAL |
Transfers the JEDI snow depth or soil moisture result from the surface data files to the restart files |
LND/ATML |
tile2tile_converter.exe |
FORECAST |
Runs the forecast model |
LND/ATML |
ufs_model |
PLOT_STATS |
Plots the results of the ANALYSIS and FORECAST tasks |
LND/ATML |
2.1.5.2. Automated Run
2.1.5.2.1. Via Crontab
To automate task submission via crontab, users must be on a system where cron is available. On Orion, cron is only available on the orion-login-1 node, and on Hercules, it is only available on hercules-login-1, so users will need to work on those nodes when running cron jobs on Orion/Hercules.
To submit jobs automatically via crontab, users should navigate to the experiment directory and launch the workflow with the add argument:
cd ../../exp_case/<EXP_CASE_NAME>
./launch_rocoto_wflow.sh add
where <EXP_CASE_NAME> is replaced with the actual name of the experiment directory (e.g., lnd_era5_warmstart_00/).
To check the status of the experiment, see Section 2.1.5.4 on tracking experiment progress.
2.1.5.2.2. Via automate_launch_script.py
To automate task submission using automate_launch_script.py, simply run the script:
./automate_launch_script.py
The console will output progress messages every 10 seconds by default:
Running ./launch_rocoto_wflow.sh ...
 Cycles: 0 out of 2 completed.
 Detected wflow_status = IN PROGRESS
 Waiting 10 seconds before next run ...

...

Running ./launch_rocoto_wflow.sh ...
 Cycles: 1 out of 2 completed.
 Detected wflow_status = IN PROGRESS
 Waiting 10 seconds before next run ...

Running ./launch_rocoto_wflow.sh ...
 Cycles: 2 out of 2 completed.
 Detected wflow_status = SUCCESS

 !!! ===== Workflow completed successfully. Stopping ===== !!!
Users can change how often the script relaunches by adding the -i argument. For example, to run the workflow launch script every 15 seconds, users would run:
./automate_launch_script.py -i=15
To check the status of the experiment, see Section 2.1.5.4 on tracking experiment progress.
2.1.5.3. Manual Submission
To run the experiment manually, issue a rocotorun command from the experiment directory:
cd ../../exp_case/<EXP_CASE_NAME>
rocotorun -w land_analysis.xml -d land_analysis.db
where <EXP_CASE_NAME> is replaced with the actual name of the experiment directory (e.g., lnd_era5_warmstart_00/).
Users will need to issue the rocotorun command multiple times. The tasks must be run in order, and rocotorun initiates the next task once its dependencies have completed successfully.
Details on checking experiment status are provided in the next section.
2.1.5.4. Track Progress
To check on the job status, users on a system with a Slurm job scheduler may run:
squeue -u $USER
To view the experiment status, run:
rocotostat -w land_analysis.xml -d land_analysis.db
If rocotorun was successful, the rocotostat command will print a status report to the console. For example:
       CYCLE         TASK                       JOBID         STATE  EXIT STATUS   TRIES   DURATION
======================================================================================================
202501190000          jcb                    11531200     SUCCEEDED            0       1       11.0
202501190000    prep_data                    11531199     SUCCEEDED            0       1       25.0
202501190000     pre_anal                    11531202     SUCCEEDED            0       1        5.0
202501190000     analysis   druby://10.184.3.61:45183    SUBMITTING            -       0        0.0
202501190000    post_anal                           -             -            -       -          -
202501190000     forecast                           -             -            -       -          -
202501190000   plot_stats                           -             -            -       -          -
======================================================================================================
202501200000          jcb                    11531201     SUCCEEDED            0       1       11.0
202501200000    prep_data                           -             -            -       -          -
202501200000     pre_anal                           -             -            -       -          -
202501200000     analysis                           -             -            -       -          -
202501200000    post_anal                           -             -            -       -          -
202501200000     forecast                           -             -            -       -          -
202501200000   plot_stats                           -             -            -       -          -
Note that the status table printed by rocotostat only updates after each rocotorun command (whether issued manually or via cron/launch script automation). For each task, a log file is generated. These files are stored in ${BASEDIR}/ptmp/<envir>/com/output/logs.
The experiment has successfully completed when all tasks say SUCCEEDED under STATE. Other potential statuses are: QUEUED, SUBMITTING, RUNNING, and DEAD. Users may view the log files to determine why a task may have failed.
2.1.5.5. Check Experiment Output
As the experiment progresses, it will generate a number of directories to hold intermediate and output files. The structure of those files and directories appears below:
${BASEDIR} (<exp_basedir>): Base directory
 ├── land-DA_workflow (<HOMElandda>): Home directory of the land DA workflow
 │     ├── jobs
 │     ├── modulefiles
 │     ├── parm
 │     ├── scripts
 │     ├── sorc
 │     └── ush
 ├── exp_case
 │     └── $EXP_CASE_NAME
 │           ├── com_dir --> symlinked to ptmp/<envir>/com/landda/v3.0.0
 │           ├── land_analysis.yaml
 │           ├── land_analysis.xml
 │           ├── launch_rocoto_wflow.sh
 │           ├── log_dir --> symlinked to ptmp/<envir>/com/output/logs
 │           └── tmp_dir --> symlinked to ptmp/<envir>/com/tmp
 └── ptmp (<PTMP>)
       └── [lnd/atml]_* (<envir>)
             └── com (<COMROOT>)
             │     ├── landda (<NET>)
             │     │     └── vX.Y.Z (<model_ver>)
             │     │           └── landda.YYYYMMDD (<RUN>.<PDY>): Directory containing the output files
             │     │                 ├── datm
             │     │                 ├── hofx
             │     │                 ├── obs
             │     │                 └── plot
             │     └── output
             │           └── logs (<LOGDIR>): Directory containing the log files for the Rocoto workflow
             └── tmp (<DATAROOT>)
                  ├── [task_name].${PDY}${cyc}.<jobid> (<DATA>): Working directory for a specific task and cycle
                  └── DATA_SHARE
                        ├── INPUT_DATM
                        ├── hofx: Directory containing the soft links to the results of the analysis task for plotting
                        ├── hofx_omb
                        └── RESTART: Directory containing the soft links to the restart files for the next cycles
Each variable in parentheses and angle brackets (e.g., (<VAR>)) is the name for the directory defined in the file land_analysis.yaml (derived from template.land_analysis.yaml or config.yaml) or in the NCO Implementation Standards. In the future, this directory structure will be further modified to meet the NCO Implementation Standards.
Check for the output files for each cycle in the experiment directory:
ls -l ${BASEDIR}/ptmp/<envir>/com/landda/<model_ver>/landda.YYYYMMDD
where YYYYMMDD is the cycle date, and <model_ver> is the model version (currently v3.0.0 in the develop branch). The experiment should generate several restart files.
2.1.5.5.1. Plotting Results
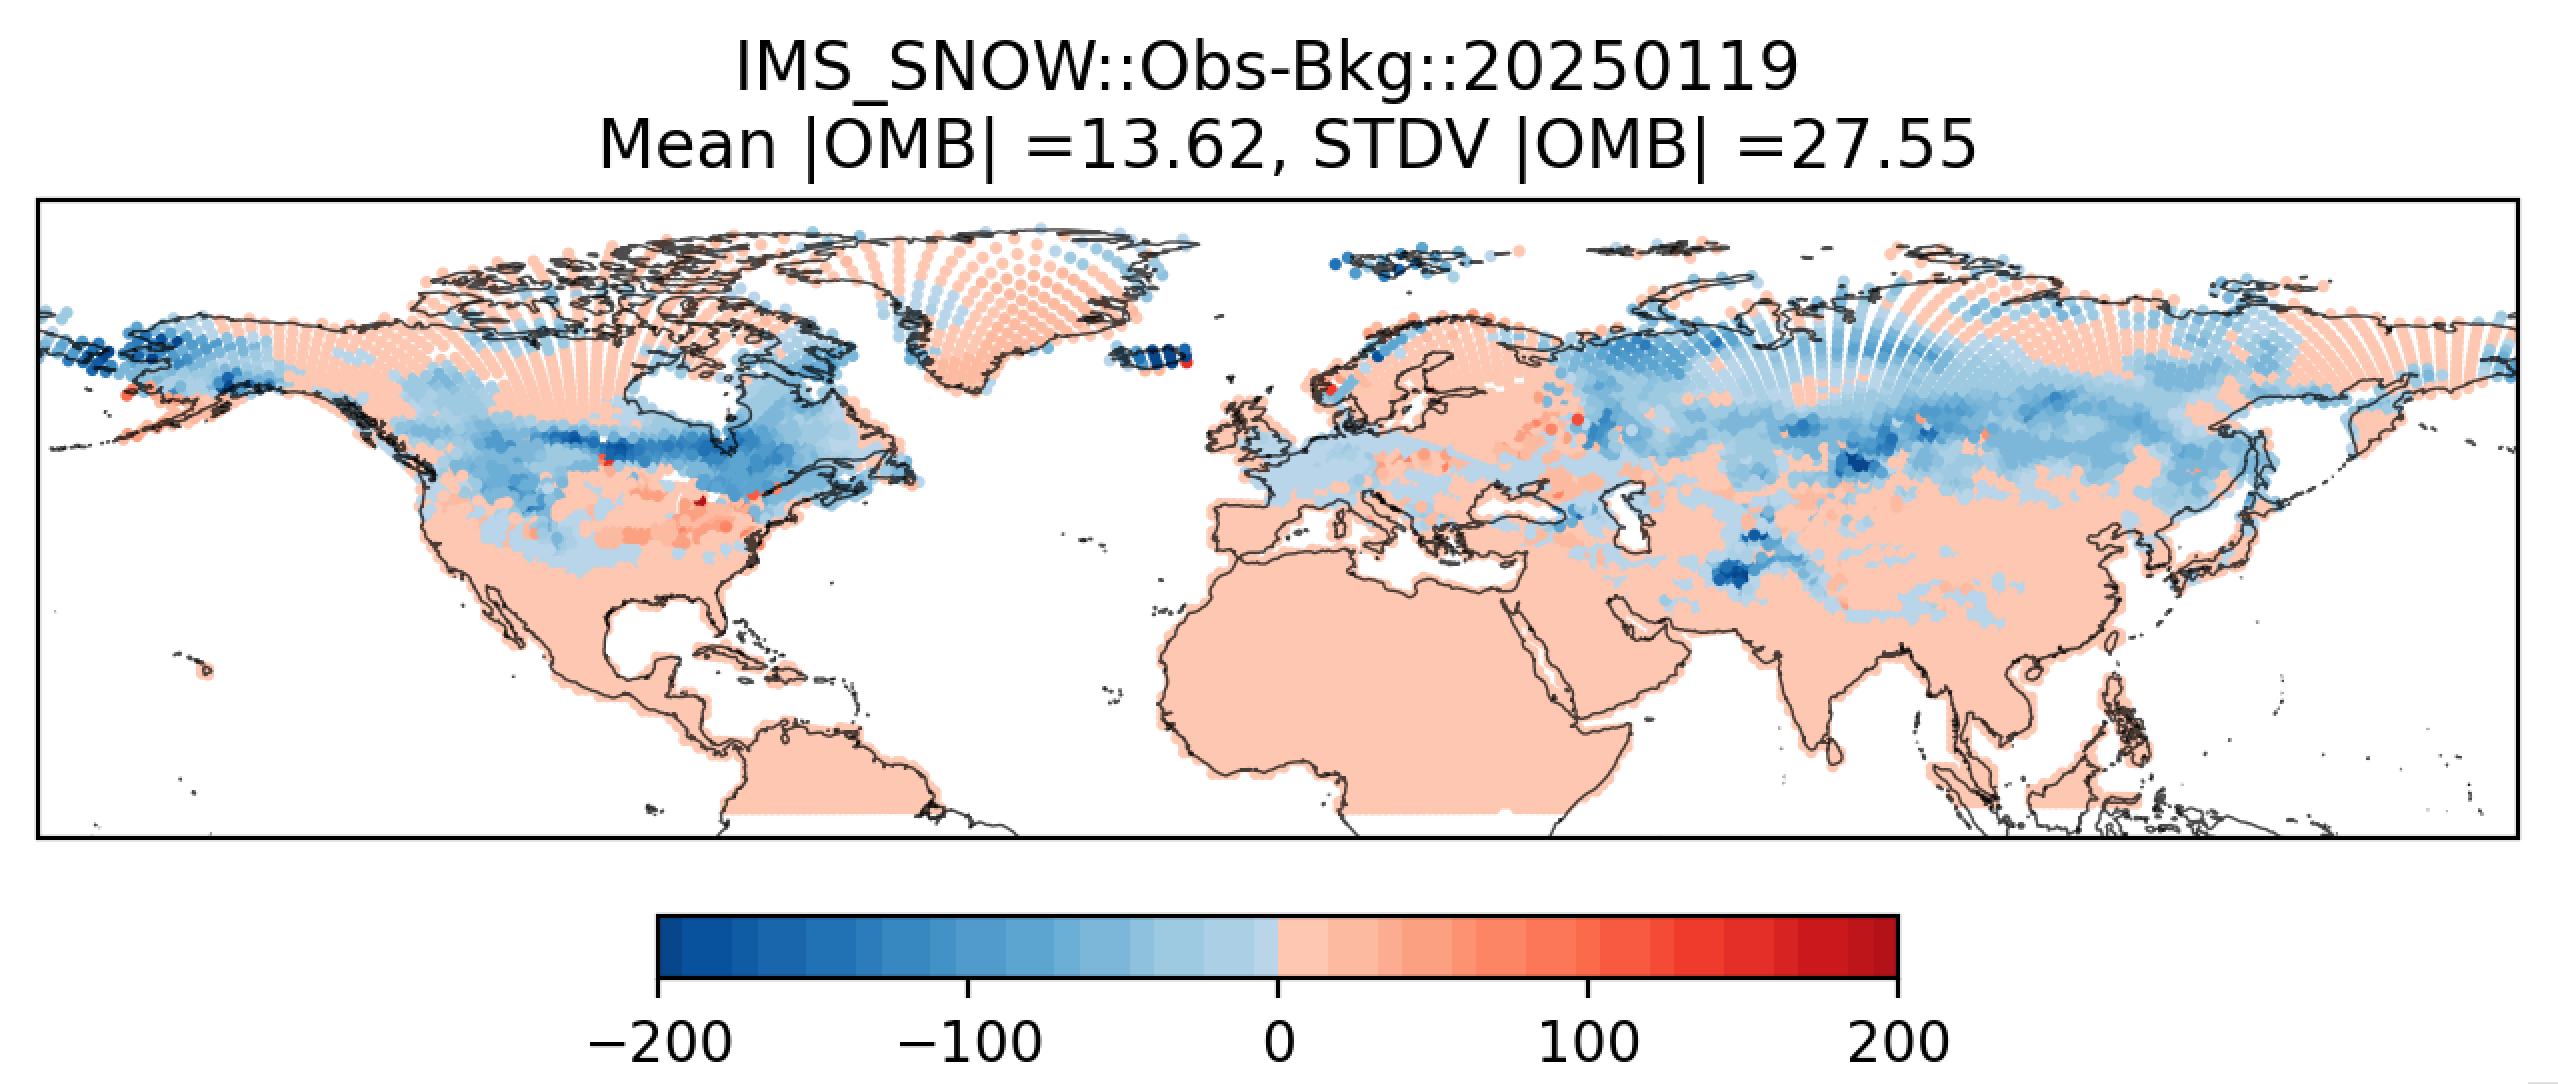
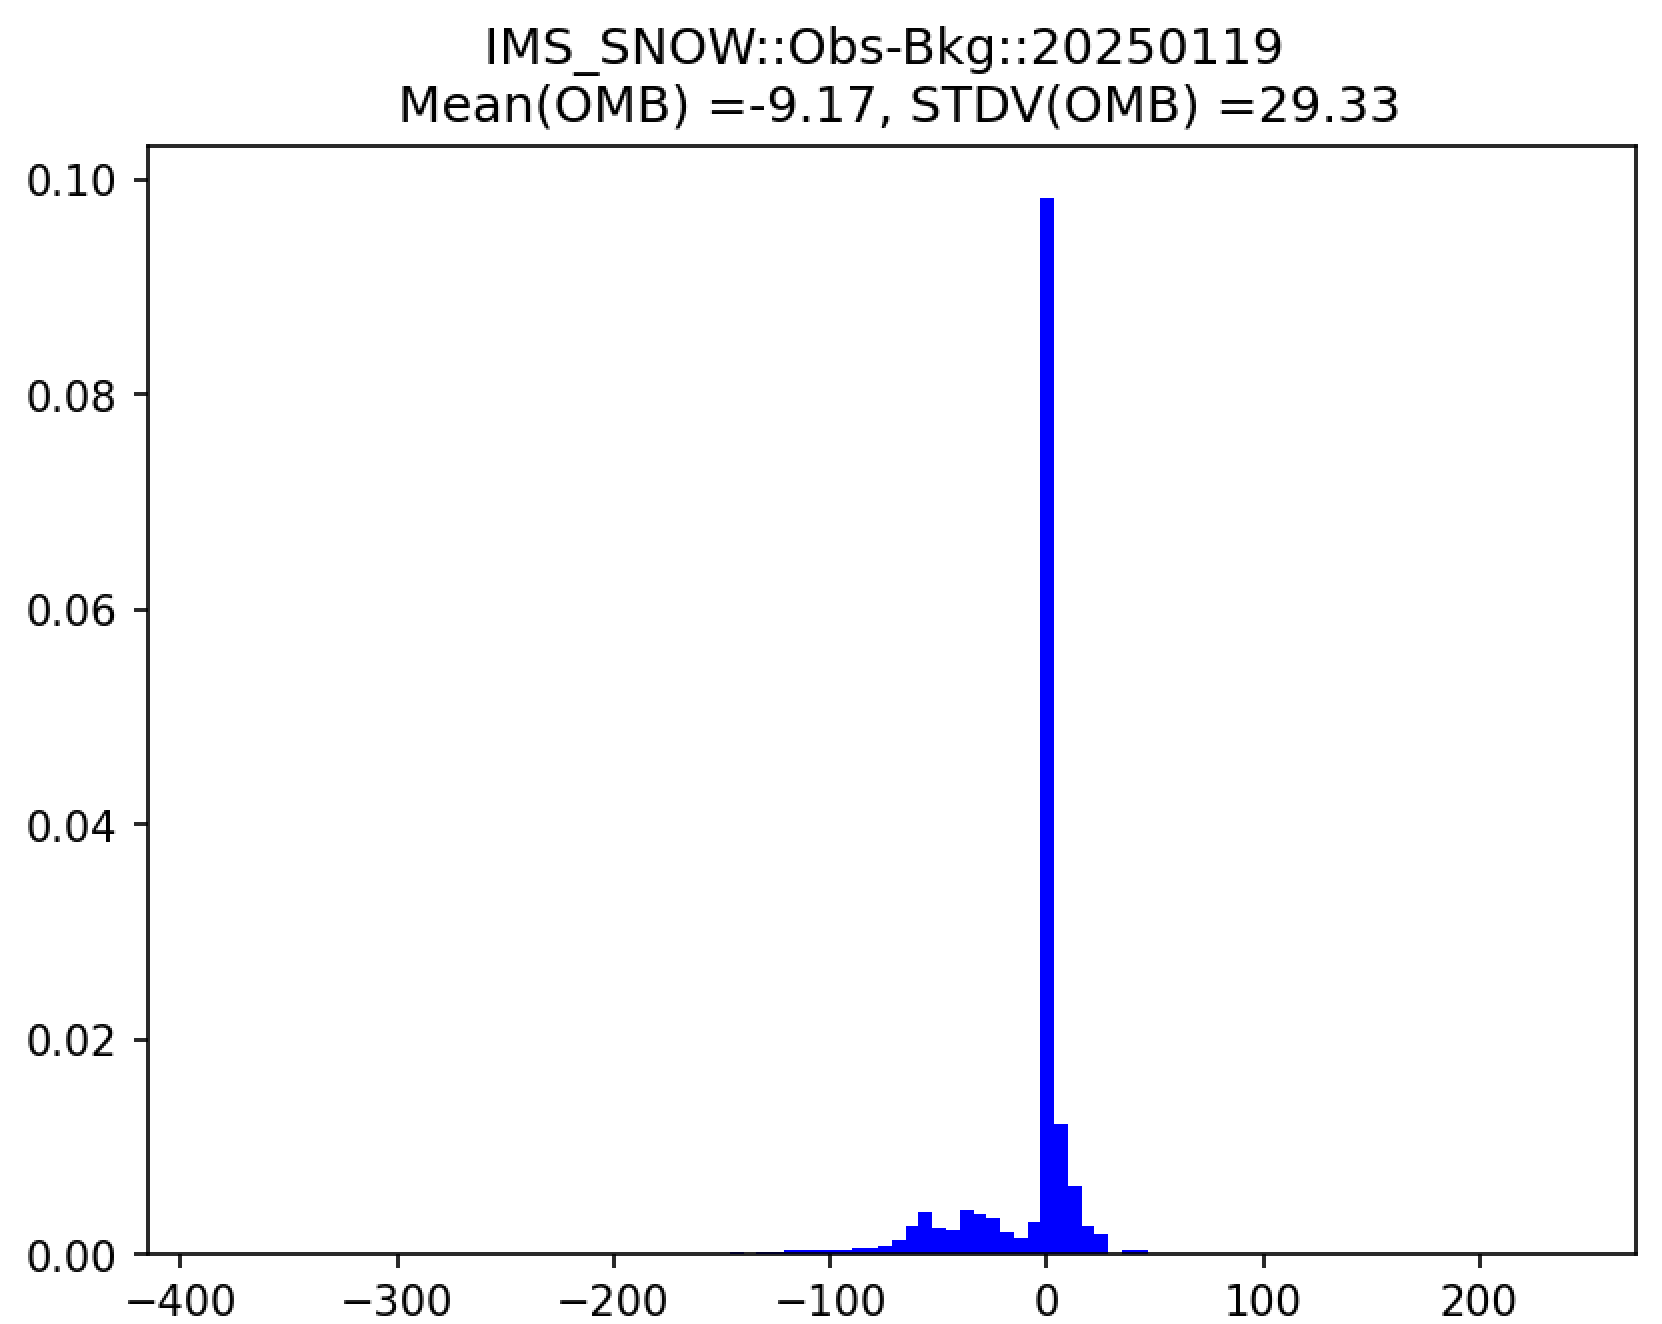
Additionally, in the plot subdirectory, users will find a variety of plots for each cycle, including scatter plots (hofx_omb_<obs_type>_YYYYMMDD_scatter.png) and histograms (hofx_omb_<obs_type>_YYYYMMDD_histogram.png).
The scatter plot is named OBS-BKG (i.e., Observation Minus Background [OMB]), and it depicts a map of snow depth results. Blue points indicate locations where the observed values are less than the background values, and red points indicate locations where the observed values are greater than the background values. The title lists the mean and standard deviation of the absolute value of the OMB values.
The histogram plots OMB values on the x-axis and frequency density values on the y-axis. The title of the histogram lists the mean and standard deviation of the real value of the OMB values.
|
|
Note
There are many options for viewing plots, and instructions for this are highly machine dependent. Users should view the data transfer documentation for their system to secure-copy files from a remote system (such as RDHPCS) to their local system.
Another option is to download Xming (for Windows) or XQuartz (for Mac), use the -X option when connecting to a remote system via SSH, and run:
module load imagemagick
display file_name.png
where file_name.png is the name of the file to display/view. Depending on the system, users may need to install imagemagick and/or adjust other settings (e.g., for X11 forwarding). Users should contact their machine administrator with any questions.